Tuesday, August 23, 2011

Red Velvet Cupcakes

Greetings,

      Red Velvet is probably one of the classiest of the desserts. Everybody loves it and its actually pretty easy to make (but don't spread that around to much). It took me years before I found this out. Eventually, I wanted to try making it for myself and I'm glad I did.
      I adapted this recipe a few years ago after watching Throw Down with Bobby Flay. The original recipe had the sugar and flour in ounces and I just didn't have the money to buy a kitchen scale, so I just converted it into cups. The result was better than expected. Now every few months I get a phone call from friends to commission me to make these cupcakes for birthdays or special events. So I guess they must be pretty good :)

Red Velvet Cupcakes
Ingredients 
  • 1 1/2 cups sugar
  • 1 1/2 cups vegetable oil 
  • 2 1/4 cups flour
  • 3 eggs
  • 1/2 tsp salt
  • 1 tsp baking soda
  • 1 oz red food coloring 
  • 1 1/2 tsp vanilla extrat
  • 1 1/4 cup butter milk
  • 1 tsp vinegar 
  • 1 1/4 tsp cocoa powder
Directions
Set oven to 350 F. Shift together flour, baking soda, and cocoa powder in a small bowl, then set aside. In a large bowl mix oil, sugar and buttermilk till combined. Then add eggs, food coloring, vinegar, vanilla and mix well. Lastly, add mix in dry ingredients a little at a time till its all combined. Be careful to not over mix.
      The batter should look something like this.

Remember when baking red velvet the food coloring has a habit of getting everywhere, so be care and wipe up whatever drips right away so the dye does not ruin any surfaces space. 
Next: Pour the batter into cupcake tins, I would suggest filling them pretty much to the top(95% full) in-order to insure a good round top on the cupcake. 
Next: Bake on 350 for 20 to 25 minutes depending, at the 20 minute mark make sure to check them. This recipe will yield a prefect 24 cupcakes.
Lastly, the frosting. As everyone knows red velvet can only be accompanied by the delicious cream cheese frosting. 
Cream Cheese Frosting
Ingredients
  • 1 box powdered sugar
  • 8oz package of cream cheese
  • 1 stick butter
  • 1 tsp vanilla
Directions
    Mix all ingredients together until well combined. Note: it is easier to frost the cupcakes when the frosting is a little chill. 


Try this recipe for yourself, I swear you'll be the hit of the party.

Much Love, 
          The Bubbly Baker

Buckeye Brownies

Greetings,

         The other day I was pretty bored at work and one of my co-workers brought over a dessert cook book from Goose Perry Patch (http://www2.gooseberrypatch.com/). The recipes were pretty simple and most were in the style of semi-homemade. The one recipe that popped out at me the most was the Buckeye Brownies. It has two of my favorite things chocolate and peanut butter.
         In the book it says to use boxed brownies. I could not do this. Instead I used the delicious Hershey Brownie recipe (recipe is made for 13x9 in pan I cut the frosting and melted chocolate in half because I used an 8x8 in pan).

Hershey Brownies

Ingredients

  • 1/2 cup (1 stick) butter or margarine, melted
  • 1 cup sugar
  • 1 teaspoon vanilla extract
  • 2 eggs
  • 1/2 cup all-purpose flour
  • 1/3 cup HERSHEY'S Cocoa
  • 1/4 teaspoon baking powder
  • 1/4 teaspoon salt

Directions

  1. Heat oven to 350°F. Grease 9-inch square baking pan.
  2. Stir together butter, sugar and vanilla in bowl. Add eggs; beat well with spoon. Stir together flour, cocoa, baking powder and salt; gradually add to egg mixture, beating until well blended. Stir in nuts, if desired. Spread batter evenly in prepared pan.
  3. Bake 20 to 25 minutes or until brownies begin to pull away from sides of pan. Cool completely in pan on wire rack. Prepare CREAMY BROWNIE FROSTING; spread over brownies. Cut into squares. About 16 brownies.

As your letting the brownies cool mix together the peanut butter frosting.
After the brownies have cooled frost them, it should look something like this............
Peanut Butter Frosting
Ingredients 
  • 2 c. powdered sugar  
  • 1/2 c. butter
  • 8oz jar of creamy peanut butter
Directions
Mix powered sugar, 1/2 cup butter and peanut butter. Mix well and spread over cooled brownies. Chill for 1 hour.

Lastly, you need to make the melted chocolate
  • 6 tsp of butter
  • 6 oz package of semi-sweet chocolate chips
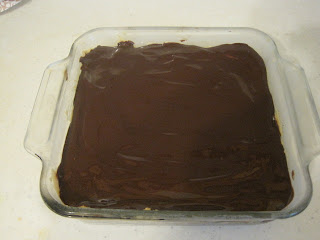
Melt together chocolate chips and butter in a sauce pan over low eat, stirring occasionally until melted. Spread over brownies. Let cool and cut into squares.

                                                                
The final result

It was the most delicious thing ever!!!!!!
Hope you guys try this recipe for yourself and enjoy them as much as I did.

Much Love, 
            The Bubbly Baker


Tri-Force Birthday Cake

Greetings,
        So even though it was my Birthday I can't help but take control and make my own cake(its a force of habit) last year I made a s'more cake with marshmallow frosting, it was epic!!!! and delicious!! This year I wanted to take it one step further and since it was also the 25th anniversary of Zelda (and since basically Zelda is my favorite video game of all time) I decided to do a Zelda cake and made the Tri-Force!!!!!!!!
       The first thing I had to decide what kinda cake it should be. I went with a moist Chocolate Cake with Peanut Butter frosting(recipe adapted from Smitten Kitten http://smittenkitchen.com/2008/08/chocolate-peanut-butter-cake/)

Sour Cream-Chocolate Cake

This cake is INTENSE. Serve it in the thinnest slices possible, and keep a glass of milk handy.
Makes an 8-inch triple-layer cake; serves 12 to 16 (the book says, I say a heck of a lot more)

Ingredients 
  • 2 cups all-purpose flour
  • 2 1/2 cups sugar
  • 3/4 cup unsweetened cocoa powder, preferably Dutch process
  • 2 teaspoons baking soda
  • 1 teaspoon salt
  • 1 cup neutral vegetable oil, such as canola, soybean or vegetable blend
  • 1 cup sour cream
  • 1 1/2 cups water
  • 2 tablespoons distilled white vinegar
  • 1 teaspoon vanilla extract
  • 2 eggs
Directions
1/2 cup coarsely chopped peanut brittle (I skipped this)
1. Preheat the oven to 350 degrees F. Butter the bottoms and sides of three 8-inch round cakepans. Line the bottom of each pan with a round of parchment or waxed paper and butter the paper.
2. Sift the flour, sugar, cocoa powder, baking soda, and salt into a large bowl. Whisk to combine them well. Add the oil and sour cream and whisk to blend. Gradually beat in the water. Blend in the vinegar and vanilla. Whisk in the eggs and beat until well blended. Scrape down the sides of the bowl and be sure the batter is well mixed. Divide among the 3 prepared cake pans.
3. Bake for 30 to 35 minutes, or until a cake tester or wooden toothpick inserted in the center comes out almost clean. Let cool in the pans for about 20 minutes. Invert onto wire racks, carefully peel off the paper liners, and let cool completely. ( Note: These cakes are very, very soft. I found them a lot easier to work with after firming them up in the freezer for 30 minutes. They’ll defrost quickly once assembled. You’ll be glad you did this, trust me.)

       After letting the cake cool, I made triangles out of parchment paper and placed them on top of the cake to cut out.


Peanut Butter Frosting
Makes about 5 cups
Ingredients
  • 10 ounces cream cheese, at room temperature
  • 1 stick (4 ounces) unsalted butter, at room temperature
  • 5 cups confectioners’ sugar, sifted
  • 2/3 cup smooth peanut butter, preferably a commercial brand (because oil doesn’t separate out)
Directions
1. In a large bowl with an electric mixer, beat the cream cheese and butter until light and fluffy. Gradually add the confectioners’ sugar 1 cup at a time, mixing thoroughly after each addition and scraping down the sides of the bowl often. Continue to beat on medium speed until light and fluffy, 3 to 4 minutes.
2. Add the peanut butter and beat until thoroughly blended.

                                           Frosted triangles

   As any Zelda fan would tell you, the Triangles are not brown but a nice crisp gold. Well I did not have gold so I had to make due with a nice yellow. I covered the cake with a yellow fondant to complete the look.
Here's my niece and the completed Tri-Force cake

Everything that day went better than expected. 

  Much Love, 
              The Bubbly Baker